hide
Let's Connect

The A to Z of Meta Business Suite: What Is It and How to Use It
Simran May 31, 2024 240 views


As one of the leading companies offering social media platforms and services, Meta occupies the majority of the social media landscape. As per a Statista study, Facebook is the largest social media platform by number of active users (approx. 3 billion), with Instagram following close behind with almost 2 billion active users. With social media marketing increasing in prominence for businesses, a strong social media presence is crucial for organisations of all sizes, whether it’s an in-house team that takes care of it for you or a professional social media company in India like us.

Meta Business Suite (formerly Facebook Business Suite) empowers you to manage your Facebook Page and Instagram account seamlessly, all from one centralised location. This comprehensive guide will equip you with everything you need to know about Meta Business Suite, from its core functionalities to maximising its potential for your business.

Understanding Meta Business Suite

Understanding-Meta-Business-Suite.jpg

Source: https://bit.ly/3wMXxTf

Meta Business Suite is a free platform designed to streamline social media management for businesses. It offers a suite of tools to create, schedule, and publish content, engage with your audience, track performance through insightful analytics, and even run targeted advertisements. As a performance-oriented SMO agency in India, we rely mainly on Meta Business Suite to streamline our social media projects.

This platform is an evolution of Facebook Business Tools, consolidating features previously scattered across different apps. It caters to businesses of all sizes, from solopreneurs to established enterprises, looking to build a strong social media presence on Facebook and Instagram.

Getting Started with Meta Business Suite

Setting up Meta Business Suite is a breeze. You can either use an existing Facebook account or create a new one specifically for your business. Once logged in, you’ll be guided through a quick setup process to connect your Facebook Page and Instagram account (or create them if you haven’t already).

After logging in, the first steps include:

  • Connecting Your Social Media Accounts: Link your Facebook and Instagram accounts to the suite.
  • Setting Up Your Business Information: Complete your business profile with relevant details.
  • Exploring the Dashboard: Familiarise yourself with the dashboard and its various components.

Navigating the Interface

The Meta Business Suite dashboard presents a clear overview of your social media activity. You can customise the dashboard to prioritise the information most relevant to your business goals.

Being an SMO agency in Delhi that has to regularly use the Meta Business Suite to handle multiple projects, the interface is sort of imprinted in our brains! The Meta Business Suite dashboard is divided into several key components:

  • Home: This is your central hub for staying on top of things. You can get a quick view of your content performance, see your to-do list, and access shortcuts to create new posts and ads.
  • Notifications: Here, you can see all your recent comments, likes, and messages from Facebook and Instagram in a single feed.
  • Inbox: Using your Inbox, manage messages, comments, and reviews from Facebook, Instagram, and WhatsApp – all in one place.
  • Content: Craft eye-catching posts and stories for both Facebook and Instagram, and schedule them for optimal impact using the Content section.
  • Planner: The Planner allows you to see your scheduled posts, stories, and ads in a calendar view. Perfect for planning and organising your social media content in advance.
  • Ads: Create and manage ad campaigns, set budgets, and target the right audience to reach your marketing goals. This is your one-stop shop for crafting a winning ad strategy.
  • Insights: Using Insights, you can track key metrics like reach, engagement, and follower growth to understand how your social media efforts are performing.
  • Settings: Customise your Meta Business Suite to fit your needs with Settings. You can manage user roles, permissions, and integrations with other apps using this.

The “All Tools” section gives you access to a treasure trove of advanced features. A/B testing, audience management, and lead generation tools are just a few waiting to be explored.

Scheduling Content in Meta Business Suite: A Step-by-Step Guide

Scheduling-Content-in-Meta-Business-Suite-scaled.webp

Source: https://bit.ly/4bZWnCz

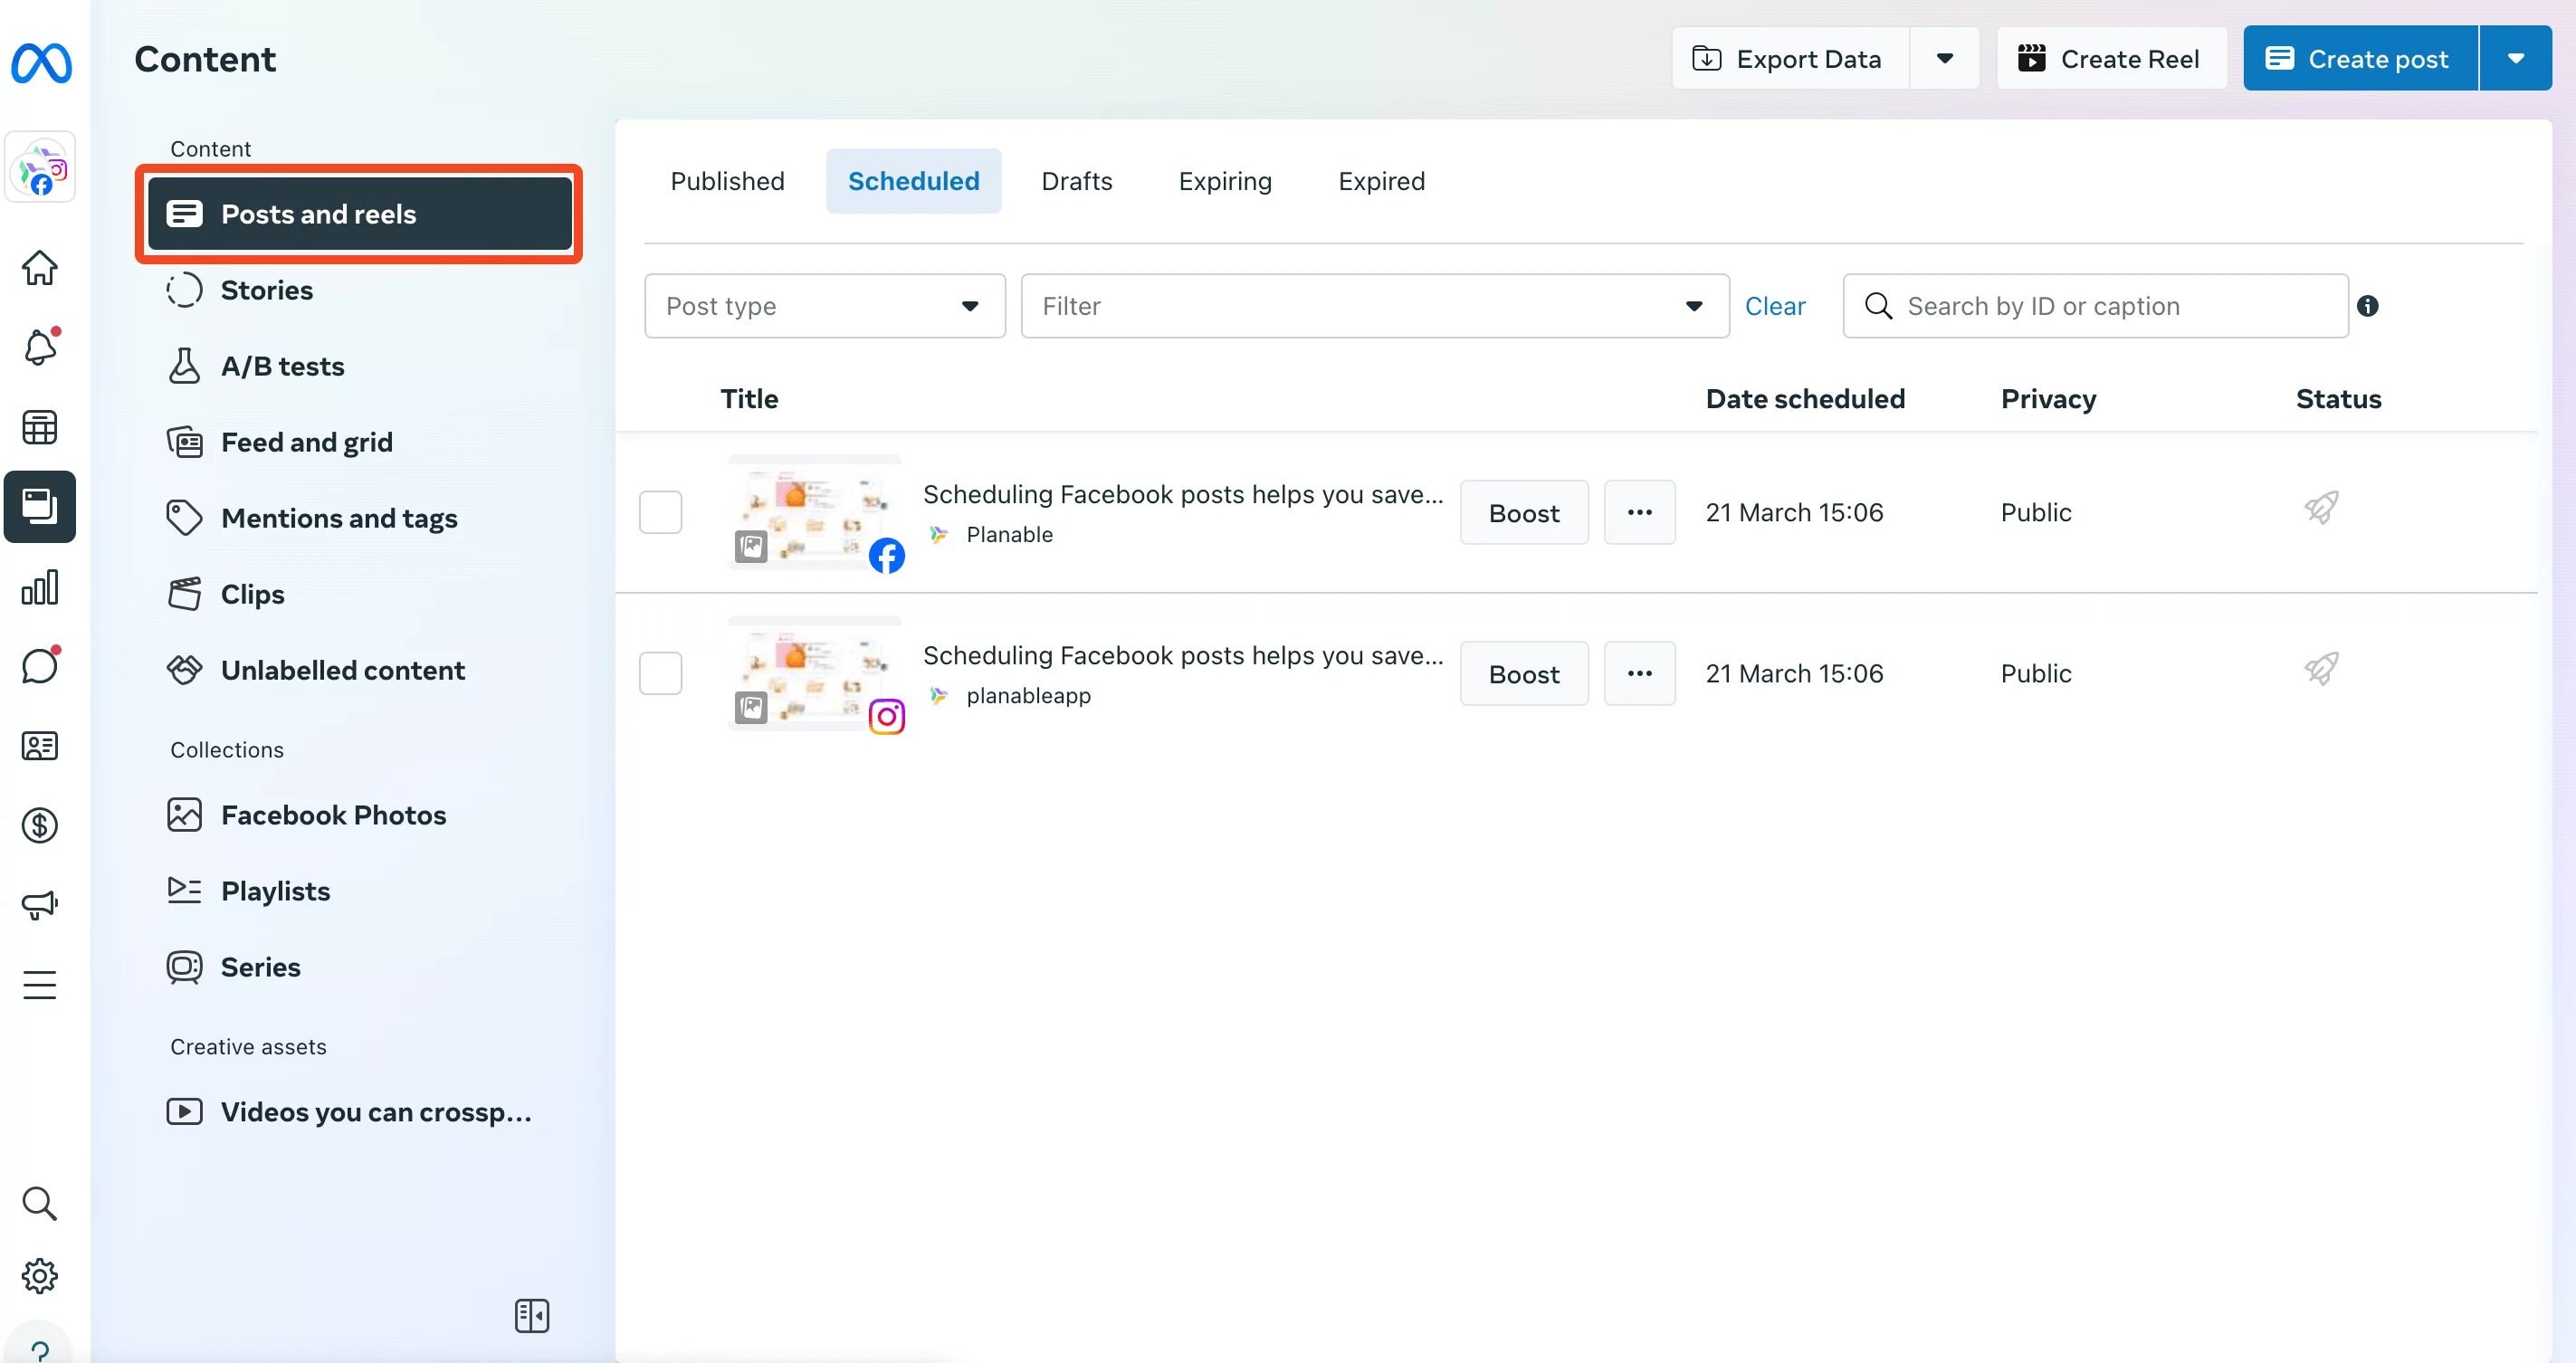
As a full-service digital marketing agency in Delhi with over a decade of experience, we understand the importance of scheduling content in advance so that you have time for other business-critical tasks.

Here’s how to schedule posts using Meta Business Suite:

  1. Choose Your Launchpad: You can schedule content from three spots in your dashboard – Home, Content, or Planner. Head to whichever feels most convenient.
  2. Hit “Create Post”: In any of these areas, look for the “Create Post” button and give it a tap.
  3. Pick Your Stage: Decide where your post will shine: Facebook, Instagram, or both platforms.
  4. Craft Your Content: Fill in the caption, add eye-catching media, and include relevant tags and location details.
  5. Fine-tune the Details: Click the “Edit” button (it appears when you hover over your media) for additional editing options.
  6. See a Sneak Peek: The right side of the screen lets you preview your post, giving you a glimpse of how it will appear on different platforms (Facebook vs. Instagram, desktop vs. mobile).
  7. Boost It (Optional): If you want to turn your post into an ad, select the “Boost” option.

Once you’re happy, choose “Schedule” to plan your post’s release, “Publish” for immediate posting, or “Finish Later” to save a draft for future edits.

Scheduling Reels with Meta Business Suite

You can captivate your audience with engaging Reels, one of the most popular content formats out there that we also use as a professional social media company. Here’s how to create and schedule them using Meta Business Suite:

  1. Locate the “Create Reel” button, often next to the “Create Post” button.
  2. Decide where your Reel will take centre stage: Facebook, Instagram, or both platforms. Simply select the appropriate accounts when sharing.
  3. Tap “Add Video” or “Add Photos” to upload your captivating clips or images. Remember, Photo Reels aren’t currently supported on Instagram.
  4. In the “Reel Details” section, write a compelling caption that grabs attention and describes your Reel clearly. Don’t forget to include relevant hashtags for maximum discoverability.
  5. Select a thumbnail from the suggested options or upload your own custom cover image. Make it count!
  6. Working with someone on your Reel? You can add their name or URL in the “Collaborator” section. They’ll be automatically notified and can accept or decline the invite.
  7. Hit “Next” to access the editing tools. Add trending audio, trim clips, or make other adjustments to perfect your Reel.
  8. Need to fix a clip? Use the “Edit” button to fine-tune your uploaded media.
  9. Want to promote your Reel further? As an optional step, select the “Boost” option to turn it into an ad.
  10. Once you’re happy, choose “Share Now” to publish instantly, “Schedule” to plan its release, or “Finish Later” to save a draft (note: draft saving is only available for Facebook Reels). Here, you can control whether viewers can remix your Reel or send gifts. You can also choose to share it publicly or within a restricted group.

Bonus: If you want to know about the best tips and hacks to use Instagram’s algorithm to grow on the platform, this blog is perfect for you.

Best Practices and Tips

As an experienced SMO agency in India, here are some of the dos and don’ts that we believe you should keep in mind when implementing your social media marketing strategy:

Dos:

  1. Use high-quality visuals and engaging captions for your posts.
  2. Maintain a consistent posting schedule.
  3. Respond promptly to messages and comments.
  4. Track your analytics and adapt your strategy accordingly.

Don’ts:

  1. Neglect audience interaction.
  2. Post irrelevant or low-quality content.
  3. Ignore negative comments.

Maximising Your Business Potential

To get the most out of Meta Business Suite, stay updated on the platform’s features and explore advanced functionalities like audience insights and ad targeting options. Additionally, familiarise yourself with upcoming updates to ensure you’re on top of the latest trends in social media marketing.

For further information and support, you can visit the official Meta Business Suite resources page or explore online communities dedicated to social media marketing.

By effectively utilising Meta Business Suite, you can take your social media presence to the next level, fostering stronger brand engagement and achieving your business objectives. If that seems like too much of a task, don’t hesitate to reach out to us. The specialist team at our SMO agency in Delhi will handle your social media seamlessly so that you can enjoy your social media fame without any worries!

Also Read: How to Score High in the Instagram Influencer Marketing Game in 2024?

Let's Connect

Write a Message